 iphone-release.com
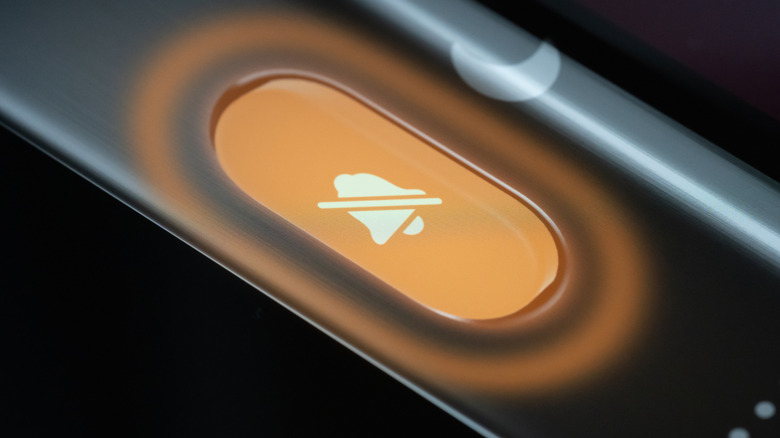
The iPhone 15 Pro and Pro Max, introduced in 2023, dropped with a whole range of new and exciting features. There’s the switch to USB-C from the proprietary lightning connector that’s been in Apple devices for years. You also have a new chip for improved performance, a titanium frame for a lighter body, and some camera upgrades for even better mobile photography. However, there’s only one feature that made the iPhone 15 Pro and Pro Max models stand out from the rest, and it’s the Action button.
Replacing the Ring/Silent switch, the Action button also sits above the volume buttons on the side of the device. This hardware upgrade is designed to trigger a particular action with just one long press. It’s highly customizable, so yes, you can make your iPhone’s Action button do nearly anything. You can use it for preset actions like activating Silent Mode, opening Flashlight, or recording a Voice Memo. But if you’re after more creative applications for the Action button, here are six ideas to try out.
Quickly share your Wi-Fi QR code
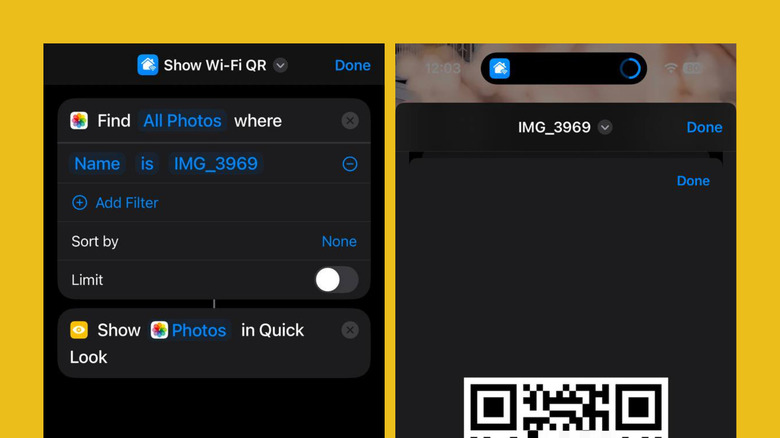
If you often have guests over and constantly have to share your Wi-Fi password, there’s a quicker way than digging through the Passwords app: Using your iPhone’s Action button. You can configure this button to instantly open the QR code for your Wi-Fi network, so guests can just scan it and connect right away. Follow these steps to get this setup ready:
- Launch the Passwords app and unlock it as you normally would.
- Go to Wi-Fi and select your home Wi-Fi network.
- Tap on Show Network QR Code and take a screenshot of the QR code.
- Launch the Photos app, tap the screenshot, and swipe up to show the image details. Take note of the screenshot’s file name.
- Go to Shortcuts and tap the plus icon in the top-right corner to create a new shortcut.
- Tap on the name at the top and select Rename.
- Enter a new name for your shortcut, such as “Show Wi-Fi QR code.”
- Add the Find Photos action, tap Add Filter, then change Album to Name.
- Change “anything” to the screenshot’s file name you noted earlier. Don’t include the file extension (e.g., PNG,.jpg”ltr”>You can now test the Action button’s new action by pressing and holding on the button. It should automatically display the screenshot of your Wi-Fi’s QR code, all without any other input required on your end.
Save your car’s parking location
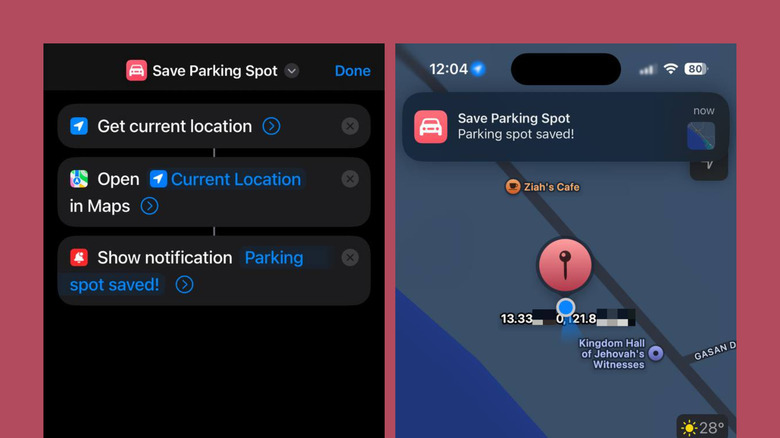
With Apple Maps, you can save and find your car’s parking location just by disconnecting from CarPlay or the car’s Bluetooth. If your vehicle doesn’t come with either one of those, though, you’d have to manually drop a pin in Apple Maps. To save you time, just use the Action button on your iPhone to save the current location of your parked car. Here’s how to set it up:
- Build a new shortcut in the Shortcuts app by pressing the plus icon on the upper right corner.
- Add the Get Current Location action. Go to Search Actions, typing “get current location” and select it from the results.
- If Shortcuts doesn’t have access to your location yet, tap on Allow Access and Allow While Using App.
- Hit the arrow next to Get current location to expand its options and change Precision to Best.
- Add the Open in Maps action. Leave the current values as is.
- Add the Show Notification action.
- Change Hello World to “Parking spot saved!” or whatever notification you prefer.
- Rename your shortcut by tapping on the down arrow next to the current name at the top, choosing Rename, and typing your name of choice.
- Hit Done in the top-right corner to save your shortcut.
- Assign this new shortcut to your Action button as you normally would.
To use the new shortcut, long-press the Action button. This will automatically open your location in Apple Maps. Expand the location panel and select the Pin option at the bottom to pin the parking spot. When you need to find your car, just launch Apple Maps again, select the pinned location under Library, and hit Go. To delete the saved parking spot, press and hold the pinned location under Library and choose Unpin.
Start a meditation session
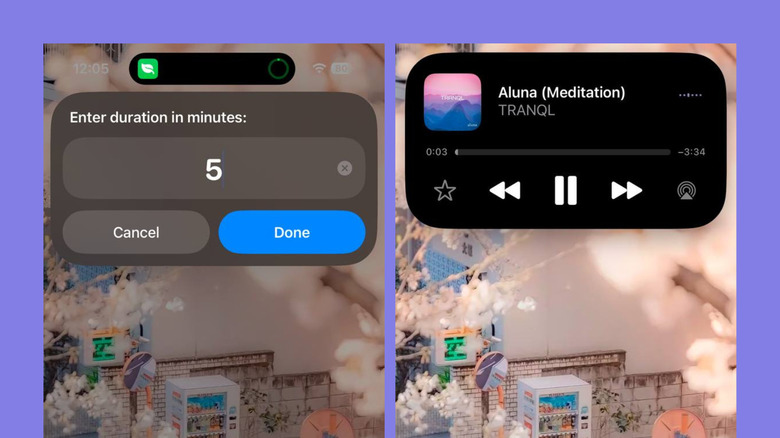
While there are several meditation apps for iPhone, some of them might not be as reliable as you’d hope, with the timers constantly dying on you. In that case, just create your own meditation timer using Shortcuts and then add it to the Action button for quick access. Here’s what you need to do to put this together:
- Create a new shortcut in the Shortcuts app.
- Name it “Meditation Timer.” You can also choose a different name if you’d like.
- Add the Ask for Input action and change Text to Number and the Prompt to “Enter meditation duration in minutes:”
- Add the Set Variable action. Set the Variable Name to “minutes.”
- Convert the minutes variable to seconds with the Calculate action. After adding this action, change the plus operation to multiplication and replace Number with 60.
- Add another Set Variable action. This time, change the Variable Name to “seconds.”
- Add Play Music action and tap on Music. Search for the Pure Meditation playlist by Apple Music Wellbeing or any other meditation playlist of your choice. Then, hit the small plus icon to use it in Shortcuts.
- Press the arrow next to the Play Music action and change Shuffle to Songs, so you can start with a new song every time you use the shortcut.
- Add Wait action and long-press on 1 second. Then, select the seconds variable (labeled with an orange X icon).
- Add the Play/Pause action. Press Play/Pause and set it to Pause.
- Save the shortcut by tapping on Done.
- Set your Action button to use this new shortcut.
Now, when you press and hold the Action button, you will be prompted to input your preferred meditation duration. Then, a hidden timer will start in the background, and the meditation music will immediately play. Once the timer is up, the music will be paused.
Access your clipboard and saved text clippings
So you’re copying and pasting text on your iPhone all the time, but there are instances when you need an old piece of text that’s no longer on your clipboard. That means you have to go back to the source and copy it again. If you’re tired of doing so, one of the most useful iPhone Shortcuts for you is the Clipboard Manager, built by Stephen Robles on YouTube. It uses an app called Data Jar to store all your text clippings. Then, the shortcut will let you save recent clippings to Data Jar and easily pull them back into your clipboard whenever you need them. Here’s how to use it for your Action button:
- Install the Data Jar app from the App Store.
- Get the premade Clipboard Manager shortcut (we slightly tweaked Stephen Robles’ shortcut for a smoother operation).
- Visit the link on your iPhone.
- Once the Shortcuts app opens, press Add Shortcut to add it to your library.
- Go to the Action Button in the Settings app and navigate to Shortcut. Press Choose a Shortcut. Select the newly added Clipboard Manager shortcut.
- Press and hold the Action button.
- Allow the shortcut to access the Data Jar app.
- Copy the text you want to save to the Clipboard Manager.
- Long-press the Action button again.
- Select Always Allow to let the shortcut share the text from Data Jar.
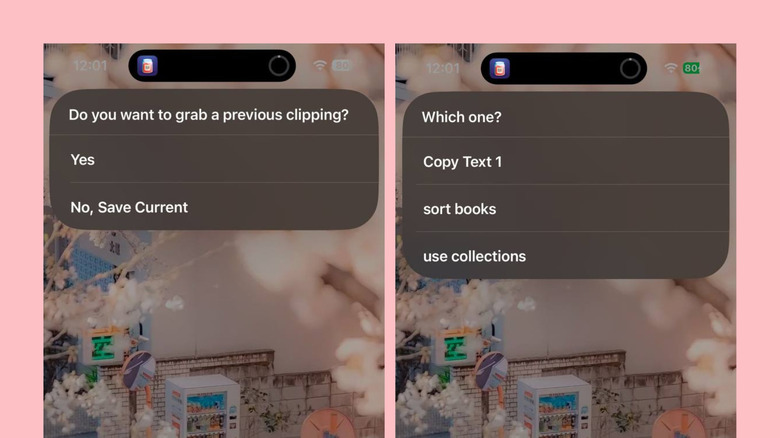
- When prompted if you want to grab a previous clipping, choose Yes.
- Tap on the text you just copied.
- Press Always Allow to give the shortcut permission to copy the text to your clipboard.
With the Clipboard Manager shortcut finally ready, you can start using it to save new text or retrieve previously copied text. To save a new clipping, simply copy the text as usual, hold down the Action button, and select No, Save Current. To use a previous clipping, long-press the Action button, choose Yes, and pick from one of the saved texts.
Convert the Action button to a menu

Normally, the Action button on your iPhone can only do one action at a time. But there’s actually a way to transform the button into a menu containing multiple actions you can pick from. First, you’ll want to set a custom icon for each of the shortcuts you want to add to your menu. This way, they’ll look different from each other and avoid confusion.
- Go to your Shortcuts app.
- Edit the shortcut by pressing on the three dots in the corner.
- Tap on its current icon at the top.
- Change it to your preferred symbol and color.
- Hit Done to save.
Next, you’ll want to create a folder and add that folder to your Shortcuts so that you can easily access it with the Action button. To set a folder shortcut:
- Press Select in the upper right corner.
- Mark all the shortcuts you want to add to your menu.
- Hit Move on the bottom and select New Folder.
- Enter a name for your folder and set a new symbol for the folder by picking from the available options.
- Press Add to save the folder.
- Open the Settings app and select Action Button.
- Swipe left until you get to Shortcut and change it to the Show Folder shortcut.
- Choose the folder you just created.
Once done, try long-pressing the Action button. A small panel containing your selected shortcuts should appear at the top of the screen. You can then select one and proceed with using that specific shortcut as you normally would. If you don’t want to select any shortcut, simply swipe the panel up to dismiss it.
Open a different app based on current Focus mode
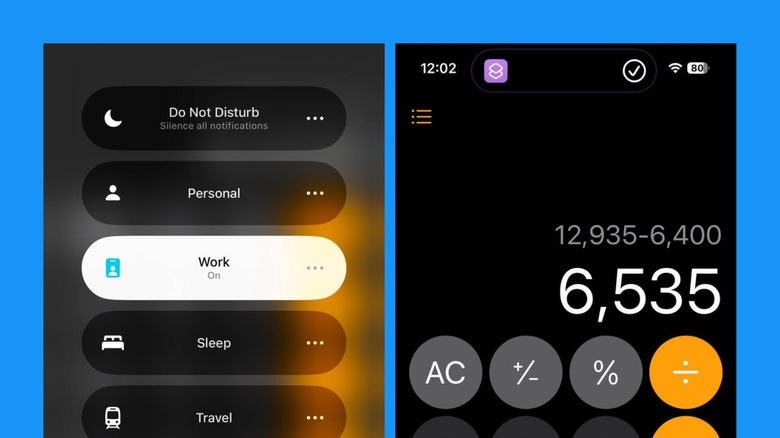
If you’re already using your iPhone’s Focus modes, another way you can maximize your productivity is by setting the Action button to launch a different app, depending on what mode is currently active. So, for instance, you could have it launch the Calculator during Work mode for your frequent calculations but make it open Camera in Travel mode for capturing the passing landscape. This way, you have quick access to the apps you need just when you need them.
- Build a new shortcut in the Shortcuts app.
- Name it “Focus-based App Launcher.”
- Add the Get Current Focus action.
- Add the If condition. Set Icon to Name. Press the “anything” value and type one of your Focus modes like Work.
- Add the Open App action under the If Name is Work condition.
- Tap App and choose what app you want to open for Work mode.
- Under Otherwise, add another If condition.
- Change Icon to Name and “anything” to another one of your Focus modes.
- Under the second If condition, add a new Open App action.
- Press App and pick your app for that specific mode.
- If you have more than two Focus modes, continue adding an If condition under the next Otherwise condition until you have all your modes assigned to a different app.
- Once you have your last If condition, delete the Otherwise condition that immediately follows that as you’ll no longer need it.
From here, you can configure your Action button to this new shortcut. Then, set the device’s Focus to a specific mode and try long-pressing the button to see if it launches your app of choice.
Source: http://www.slashgear.com/1759424/iphone-action-button-creative-uses/
You may also like


If your vehicle doesn’t come with either one of those, though, you’d have to manually drop a pin in Apple Maps.