 iphone-release.com
iPhones are among the most reliable and feature-rich smartphones available. However, for seniors who didn’t grow up with smartphones, using an iPhone can feel like navigating uncharted territory. While its sleek design and powerful features appeal to tech-savvy users, they can seem intimidating or overly complex for those unfamiliar with modern technology.
Thankfully, iPhones are highly customizable and built with accessibility and user-friendliness in mind. With a few thoughtful adjustments, you can simplify these devices and make them easier for seniors to use. These changes empower elderly users to confidently manage everyday tasks, such as making calls, sending messages, and browsing the internet, without frustration or the need for assistance.
From decluttering the home screen and enlarging text for better readability, to enabling LED flash alerts and activating emergency SOS features, this guide covers all the essential tips to make an iPhone more senior-friendly. Whether you’re assisting a parent, grandparent, or an elderly friend, these straightforward adjustments will ensure their iPhone is intuitive, functional, and enjoyable to use. Let’s dive in!
Start with the basics
One of the first things you should do is organize the apps on the home screen. Instead of keeping all the apps, it’s best to limit the home screen to only the most essential ones, such as Phone, Messages, and Photos. This will reduce the need to flip between multiple pages to find key apps. Another thing you should do is add important contacts to the iPhone’s Favorites list. This can help seniors quickly call or message their most important contacts, such as family members, friends, or caregivers, without having to search through their entire contact list. To set this up, just open the Phone app, go to the “Favorites” tab, and tap the “+” button to add contacts.
Next, for seniors who may struggle with small text or have difficulty reading, you can add the iPhone’s magnifier tool to the Control Center. This will allow them to zoom in on text or objects for better clarity, making it easier to read menus, labels, and other fine print. To do this, open the Control Center and tap the “+” button in the top-left corner. Then, select “Add a Control,” and then choose Magnifier from the list.
Finally, you should consider setting up Siri on the iPhone. This will allow your elderly friend or relative to interact with the iPhone and make phone calls using just their voice. They can even use Siri to get answers to questions, check the weather, and set up reminders easily.
Increase the text size or turn on Display Zoom
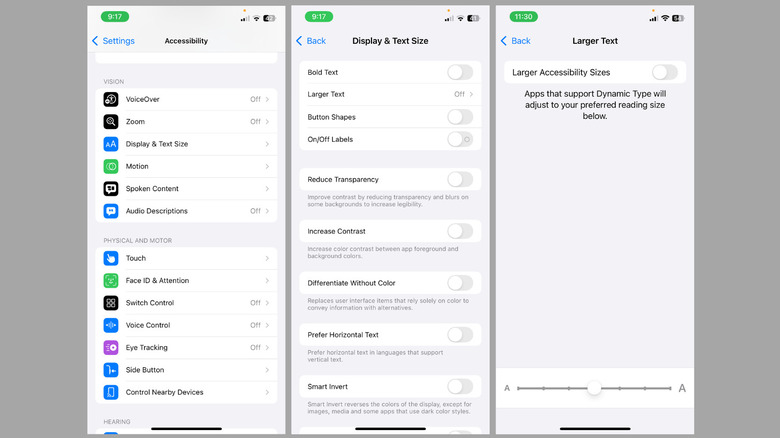
While the default text size on iPhones is ideal for the average user, it can be challenging for seniors with poor vision to read small text or navigate the interface. Hence, it’s a good idea to increase the text size on the iPhone so that the senior person can easily read the text in messages, emails, and across the screen. Here’s how to adjust the text size on an iPhone:
- Open the Settings app and head to Accessibility > Display & Text Size.
- Select the Larger Text option.
- Drag the slider to your right to increase the text size. You can also enable the “Larger Accessibility Sizes” toggle for even bigger text if needed.
For seniors who may need more than just larger text, you can consider enabling the Display Zoom feature. Doing so will enlarge all elements on the iPhone’s screen, including app icons, buttons, and text. This can provide a clearer and more readable interface, particularly for those with limited vision. To enable Display Zoom on iPhone, follow these steps:
- Open Settings and select Display & Brightness.
- Scroll down and tap Display Zoom.
- Select Larger Text and tap Done to confirm.
- Select Use Zoomed to accept the prompt to restart your iPhone and apply the change.
Enabling either of these features can make it easier for seniors to navigate their iPhones comfortably and enhance their overall experience.
Enable Assistive Access
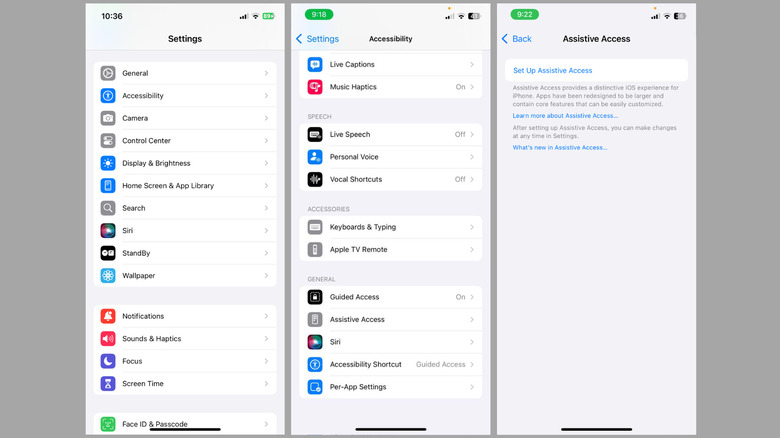
Even with larger text and icons, the standard iPhone interface can still be overwhelming for some seniors. In such cases, you can set up the Assistive Access feature, which is available on iPhones running iOS 17 or higher. It’s a feature designed for individuals with cognitive disabilities but works equally well for seniors who prefer a simpler, distraction-free experience. Assistive Access streamlines the iOS interface by minimizing distractions and optimizing key apps like Calls, Camera, Messages, Photos, and Music with larger text labels and high-contrast buttons. Here’s how to set it up:
- Open the Settings app and head to Accessibility > Assistive Access.
- Tap Set Up Assistive Access, then hit Continue.
- Choose the correct Apple ID and tap Continue again.
- Select the preferred app layout — Rows or Grid — and tap Continue.
- Choose the apps you want to make available by tapping the plus icon next to their names.
- Tap Continue again and set a passcode that will be required to exit Assistive Access. You can also set up a Recovery Apple ID in case the passcode is forgotten.
- Tap Start Using Assistive Access and enter the passcode to activate it.
Once activated, the iPhone’s home screen will be simplified, with larger app icons and a dedicated back button for easy navigation. The user can exit Assistive Access at any time by triple-clicking the side button and entering the passcode. To reactivate it later, simply go to Settings > Accessibility > Assistive Access, and tap Start Assistive Access.
Enable sound recognition notifications and LED flashes for alerts
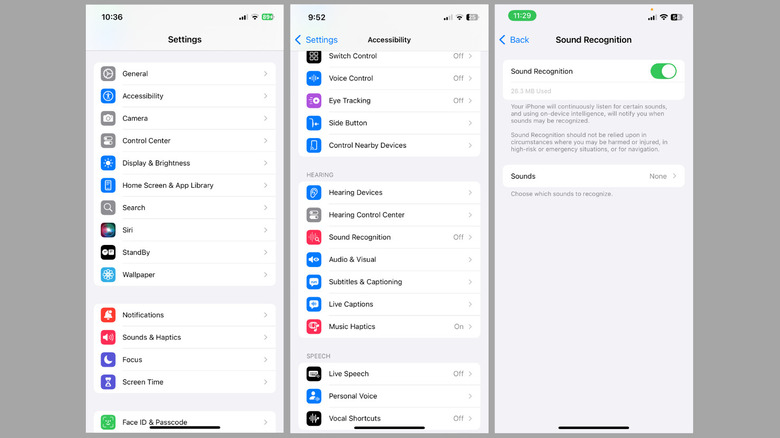
For seniors who have difficulty hearing, being aware of all notifications or important sounds in their surroundings can be a challenge. Sound Recognition is a built-in accessibility feature that enables the iPhone to listen for specific sounds — like a doorbell, smoke alarm, baby crying, or running water — and notify the user. Here’s how to enable Sound Recognition on your iPhone:
- Open the Settings app on the iPhone.
- Navigate to Accessibility > Sound Recognition.
- Turn on the Sound Recognition toggle.
- Tap Sounds and select the types of sounds you’d like the iPhone to recognize, such as a fire alarm, doorbell, or baby crying. You can even customize the notification sound, so that the elderly can easily identify the alert.
Another accessibility feature you should enable is Flash LED for Alerts. In addition to audible notifications, this feature provides a visual cue by making the iPhone’s LED flash for incoming notifications, calls, and alerts. Since the bright LED flashes are hard to miss, they can help seniors notice iPhone alerts even in noisy or distracting environments. To enable it, go to Settings > Accessibility > Audio/Visual, and turn on LED Flash for Alerts. You can also choose whether the LED should flash when the phone is unlocked or in silent mode.
Set up Medical ID and Emergency SOS
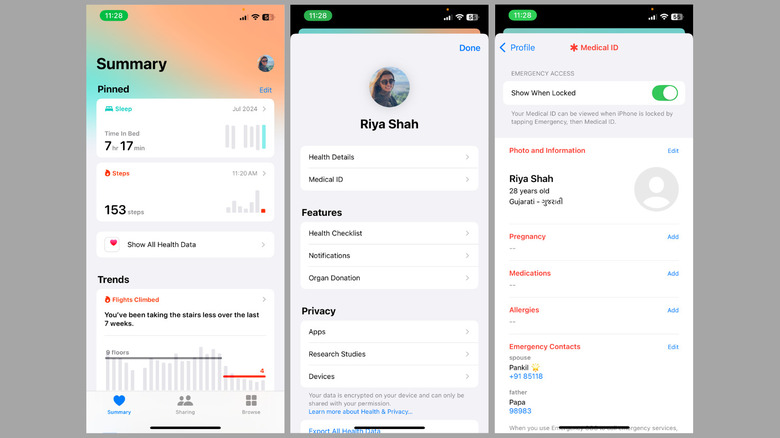
In emergencies, having quick access to a senior’s medical information can be life-saving. That’s why you should enable Apple’s Medical ID on the iPhone you’re setting up. This allows first responders and healthcare professionals to access important medical details — such as allergies, medications, blood type, and emergency contacts — without unlocking the iPhone. It can be especially helpful in emergencies when the user is unable to communicate. Here’s how to set it up:
- Open the Health app and go to the Summary tab at the bottom.
- Tap the profile picture in the top right corner and select Medical ID.
- Tap Get Started or Edit and fill in all the essential information along with the emergency contact.
- Turn on the toggle next to “Show When Locked” so that the paramedics can access this information from the lock screen.
- Double-check the information and tap Done to save it.
Additionally, you should enable the Emergency SOS feature and make your elderly friend familiar with how it works. This feature allows the user to automatically contact local emergency services by pressing and holding the Side button and one of the Volume buttons (or pressing the Side button five times). It can also notify trusted contacts you’ve added in the Health app. To enable this feature, go to Settings > Emergency SOS and toggle on the necessary options.
Source: http://www.slashgear.com/1771845/simplify-iphone-seniors-elderly-settings-make-more-user-friendly/
You may also like

